3 exercises to prevent low back pain

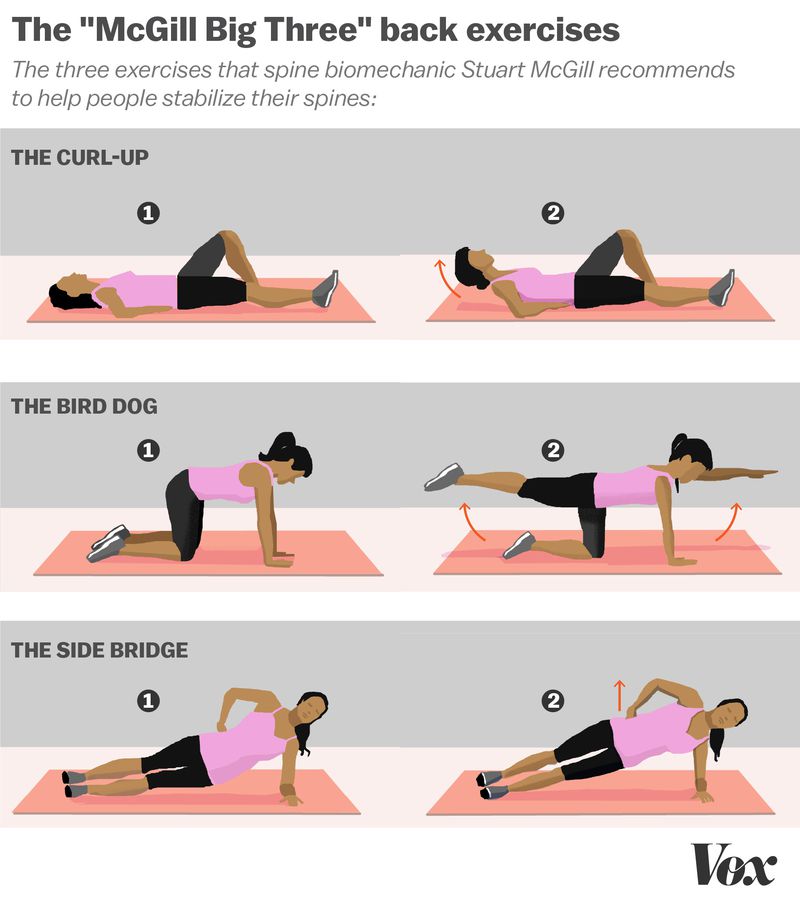
These 3 exercises are termed ‘the Big 3’ by spinal researcher Dr Stuart Mcgill. The exercises are performed in a neutral back position – a spine sparing position and it helps to build muscular fitness along with stability and control throughout the spinal column. Spinal stability is what creates a strong core.

You do not have to be in pain to perform these exercises. These are actually best used as a preventative method to prevent back pain! Although if you are in pain, they are still a great way to help you get your core switching on again.

Some things to note:

·   The exercises must be performed daily

·   The best time is mid-morning or dinner time. Not upon waking – as this is when the spinal discs are at their fullest and therefore less room to move

·   Reps and sets are important to what you can tolerate. There is no point trying to push through excruciating pain. Find your level and then progress

·   Try and ensure that all 3 exercises are performed in a pain free posture for your spine.

1. Bird dog

Position yourself on all fours. Raise your right hand forward while simultaneously extending your left leg back, until both are parallel. Bring both arm and leg back into the resting position and then repeat with the opposite arm and leg. This is one rep.

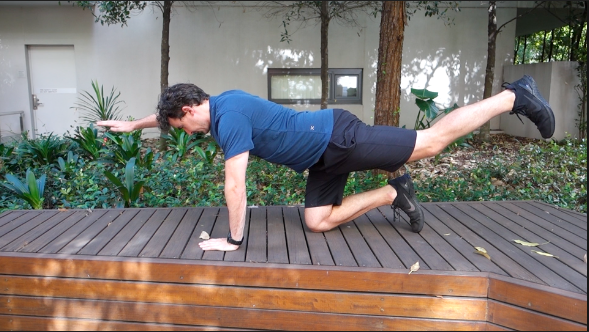
Make sure your pelvis has minimal rotation while performing this exercise. The value of this exercise is coordinating upper back, lower back and hip movement all together.

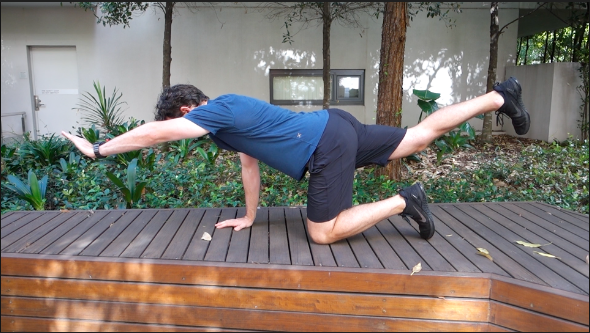
Perform 1 set of 8, followed by another set of 6, with a final set of 4.
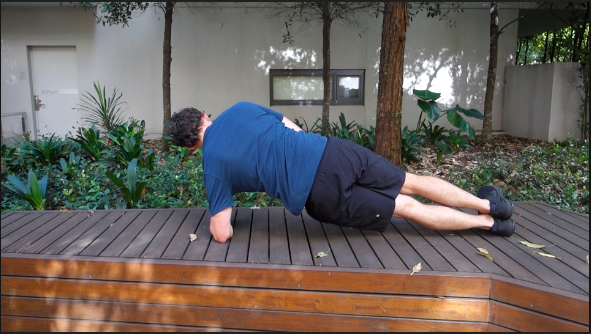
2. The side plank

Lie on your side, resting on your bent forearm, with your legs straight out

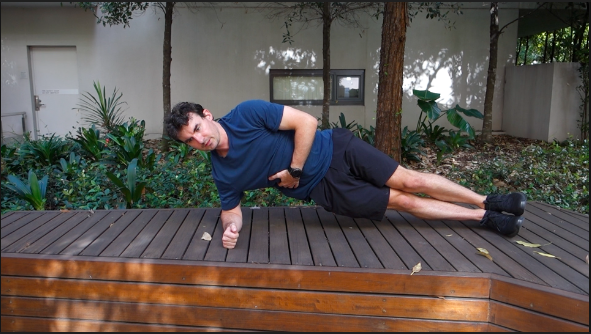
Lift your hips off the floor and hold for 10 seconds. You should feel your abdominal muscles and obliques (side) working. This exercise also works the quadratus lumborum (QL), a major spine muscle that plays a role in spine flexion and rotation. This exercise gets the  QL and oblique muscles working together in coordination.

Perform 3-4 holds per side of 10 seconds each. Repeat for 3 sets, but with each set, reduce the reps by 1.

3.      The curl up

The Mcgill curl up is not like your traditional curl up. There is no movement from lumbar spine.

Start by lying on the ground, with 1 leg bent up and the other leg straight (the painful side should be the one with the straight leg). Place both hands under the small of your back, this will ensure minimal movement through the lower back.

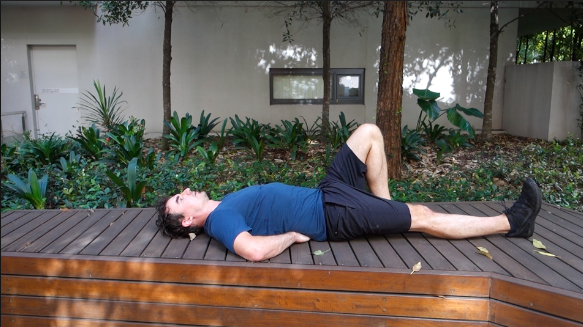
Lift your head off the ground by a few inches and then hold it there for a count of 10. The goal is to perform this without any movement in the lower back. If you feel your lower back rounding, then your head or shoulders are too high off the ground.

During this, you should feel your abdominal muscles brace – this is the spinal stability

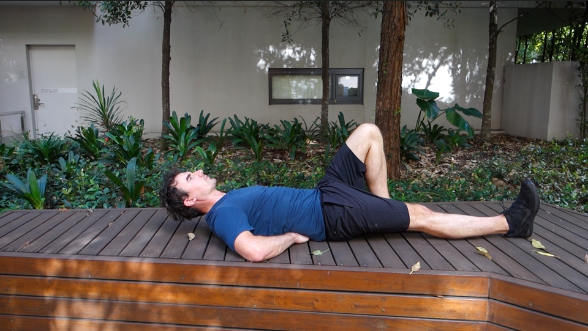
Repeat another 5 times for a total of 6 reps. The recommended volume is 1 set of 6, followed by another set of 4 and the final set of 2. You do not need to hold the curl up for more than 10 seconds, rather to progress you can increase the reps.

Conclusion

I recommend using these exercises every day as the best preventive measure to avoid lower back pain. If you do have back pain, they are also great to perform as they can be done in a pain free position. The key is being consistent, once a day and before any exercise.

Mitchell Roberts – Chiropractor

The 3 best exercises to prevent low back pain

A question I often get asked in clinic is what are the best exercises to perform to prevent low back pain. The below exercises are my ‘go-to’ for prevention of low back pain. They have been termed ‘The McGill big 3’ – named after the researcher Stuart McGill.

Stuart McGill is a spinal biomechanics researcher from The University of Waterloo, Canada. These role of these 3 exercises is to create spinal stability and endurance – which is essential for creating a stable foundation for the lower back.

The exercises aim to tighten up the front and sides of the core, while supporting the spine and remove gravity from the equation. The exercises are of a low intensity and are safe to perform.

Curl up – 3 sets of 10-12 reps

Bird dog – 3 sets of 10-12 reps

Side bridge – 3 sets of 8-10 seconds holds, each side.

If the above rep scheme is too hard, you can always modify it by reducing the number of reps and work your way up to the noted rep scheme.

It is also recommended to do these exercises before training as well, as it has shown to tighten and stiffen the core post performing them.

Perform these exercises once a day, not into pain. If you do have questions, pain or discomfort when performing these exercises, come in and see us and we can either correct your technique or advise you on alternative exercises.


References:

McGill, S.M. (1997) The biomechanics of low back injury: Implications on current practice in industry and the clinic. J. Biomech. 30: 465-475.
McGill, S.M., Low Back Disorders: Evidence based prevention and rehabilitation, Human Kinetics Publishers, Champaign, Illinois, 2002.

Mitchell Roberts – Chiropractor 

A few gardening tips!

Injuries from gardening is a common presentation to the clinic. We often fine with the changes in season, people come out to garden and do too much the first time after a long break.

Orchid
One of Neil’s Orchids at Mona Vale Chiropractic Centre


Gardening is a lot of repetitive movements, of which if not done correctly, could lead to injury. A few tips on ensuring a comfortable gardening session:

  •  Warm up! Walk and a few stretches before you start will ensure your body is ready to start an active session
  •  Reduce the amount of twisting – Twisting places an uneven strain on the muscles and joints. Make sure you squarely face whatever you are working on, this minimises the amount of twisting that can occur.
  •  Take regular breaks! Especially if you are just starting gardening after a long time off. Frequent breaks are a great way to minimise injury and let the body rest and recover. Every 15-20 minutes with a 5-minute break in between is a good start.
  •  Keep your elbows bent when digging – this reduce the amount of strain on the forearm muscles. If they are over worked too quickly tennis elbow can occur – a form of tendinopathy.
  •  Frequently switch sides when raking those autumn leaves, keep the knees and elbows both bent and make sure your grip is relaxed. Also, using a scissor stance is the most efficient technique.
  •  Kneeling on one knee is the best position for weeding
  •  Use your hips and legs when picking up pots – stand square on bend at the hips and knees while keeping your back straight (think hinging at the hips). Keep the pot as close to your body as possible and avoid twisting while holding it.
  •  Plant pots on a table, not the ground

The most important thing to remember is to pace yourself!

Mitchell Roberts – Chiropractor 

Ice or heat?

Ice or heat? Which is better?

I am often asked by patient which is best, ice or heat for an injury. The simple answer is that it depends on the type of injury and how long it has been there for.

Firstly, let’s see what impact ice and heat can have on the bodies tissues:

Ice:

  •  Decrease blood flow to an area
  •  Decrease swelling/inflammation
  •  Generalised numbing of an area
  •  Constrict/tighten muscles

Heat:

  •  Increase blood flow to an area
  •  Relaxation of tight muscles
  •  Increased movement/mobility

As you can see, ice and heat have opposite effects.


When to apply ice – Immediately  and up to 72 hours after an injury has occured, with the aim to reduce the pain and swelling. The most common areas being ankle, knee, wrist and shoulder. Use ice for a period of 20 minutes every 1-2 hours

When to apply heat:

  •  Chronic injuries – longer than 12 weeks
  •  Muscle or joint stiffness/tightness
  •  Osteoarthritic joints – warms the joint up, encourages blood flow to the area before moving
  •  Before exercise – especially that early morning golf tee-off


When not to apply ice – Onto burns or sensitive skin. Avoid using before or during exercise, as it may reduce the flexibility of a joint/muscle

When not to apply heat – On acute inflammation (swelling, redness or hot), open wounds and avoid using if you are diabetic.

If in doubt as to which one to use, ask your chiropractor!


Mitchell Roberts – Chiropractor

Updated low back pain treatment guidelines

One of the top medical journals – The Annals of Internal Medicine, has published a paper updating the guidelines for the treatment of low back pain. The paper is titled ‘Non invasive treatments for acute, subacute and chronic low back pain: A clinical practice guideline from the American College of Physicians” February 2017. The authors of the guidelines looked at studies of non-invasive (IE not surgical) interventions for treating acute, subacute and chronic low back pain.

It should be noted that acute pain lasts less than 4 weeks, subacute lasting between 4-12 weeks and chronic being pain lasting longer than 12 weeks.

The authors concluded that the following can help as a first line treatment (before taking medications) for acute/subacute low back pain:

  •  Heat
  •  Spinal manipulation
  •  Massage
  •  Acupuncture

Medication should only be considered if there has been no improvement. Patients should discuss the possibility of taking ibuprofen or muscle relaxants with their health care professional.

For chronic low back pain (lasting more than 12 weeks), the authors concluded that the following can help as a first line treatment:

  •  Exercise
  •  Rehabilitation
  •  Spinal manipulation
  •  Acupuncture
  •  Mindfulness based stress reduction – meditation

At Mona Vale Chiropractic Centre, we can use the above recommended techniques to assist and help relieve low back pain. Also, if you are not keen on having spinal manipulation, there are many other techniques that we can use to get the results you are after.

Click on the link to read the full article: http://annals.org/aim/article/2603228/noninvasive-treatments-acute-subacute-chronic-low-back-pain-clinical-practice

Mitchell Roberts – Chiropractor 

Sciatica

Sciatica is a common presentation to the chiropractor. We often hear a patient saying they have a ‘pinched nerve’, but sciatica is normally not that simple as there are a number of factors that can cause it.

We will start of with some simple anatomy – The sciatic nerve arises from several segments in the lower back, in the lumbar and sacral spine, joining together to form one big nerve which travels through the hip, buttock and all the way down to the toes, branching out as it goes.

sciatic-nerve

Symptoms are often varied, although the main one is pain down the leg, with the ‘classic’ sciatica causing pain in the calf and foot. Other symptoms can include pins and needles, numbness and weakness of the muscles. Very rarely, losing function of the bowel and bladder can occur, which requires urgent medical intervention.

Causes: There are a number of causes for sciatica, here are the most common ones:

  • Disc – A herniation or rupture to a disc can cause leakage of disc contents into the spinal canal and thus place pressure on the nerve. Furthermore, inflammation associated with the injury can also irritate the nerve.
  • Bony growths – These can narrow the canal of where the nerve exits the vertebral column, reudcing the amount of space for the nerve to exit
  • Piriformis syndrome – In a small percentage of individuals, the sciatic nerve passes through the middle of the piriformis muscle (gluteal region). When it is tight it can compress the nerve
  • Joint strain – Inflammation from a joint sprain can irritate the nerve
  • Spondylolistesis – A forward slippage of the vertebra which can compress the spinal cord or exiting nerves

Sciatica causes

Diagnosis – Here at Mona Vale Chiropractic Centre we will perform a thorough history and examination involving orthopaedic and neurological testing to come to a diagnosis. If we believe you require imaging such as x-ray or MRI this can be arranged and we will refer accordingly. Communication with your GP will also occur and if we feel chiropractic treatment is not appropriate for your condition, a referral to the appropriate healthcare professional will be done.

Treatment – There are a number of different treatment options, some of the ones we use include: Adjustments and mobilisations, muscle releases, dry needling, stretching and rehabilitation exercises. The treatment will be aimed to address the cause of the sciatica through improving movement, decreasing inflammation and strengthening surrounding muscles.

What can be done in the meantime for sciatica? Keep moving is the simple answer! Avoid aggravating movements such as bending,twisting and prolonged sitting. Moving encourages blood flow through the joints and muscles to reduce the chances of the lower back from tightening up. Heat is recommended if the injury has been longer than 24 hours.

Mitchell Roberts – Chiropractor